How to Take Amazing Travel Photos with just your iPhone

Believe it or not, as a photographer, photos are pretty important to me. 😉 I love being able to capture memories for others and I love having photos for myself to look back at, especially when it comes to my travels.
While I’m traveling, the goal is to strike the balance of living in the moment and getting awesome photos. Over the past few years I’ve learned that iPhone cameras are more than adequate and when used well, they hit this balance better than any other camera.
This post is all about taking the things I’ve learned from photographing weddings and applying them when I’m shooting with my iPhone. Regardless of what camera you have in your hands, a flip phone or a big fancy DSLR, the “rules” of photography remain the same.
The 2 most important elements of any photo are the lighting and the composition. Once you get a handle on these 2 concepts, you will be able to rock it out with any camera!
So, let’s dive into finding good light.
**For this post, my friend and I visited the St. Louis Art Museum and played around with different lighting scenarios and compositions to show y’all what a difference it can make. All the photos in this post were shot with an iPhone 8 and are completely unedited.
Tips for Finding Good Light
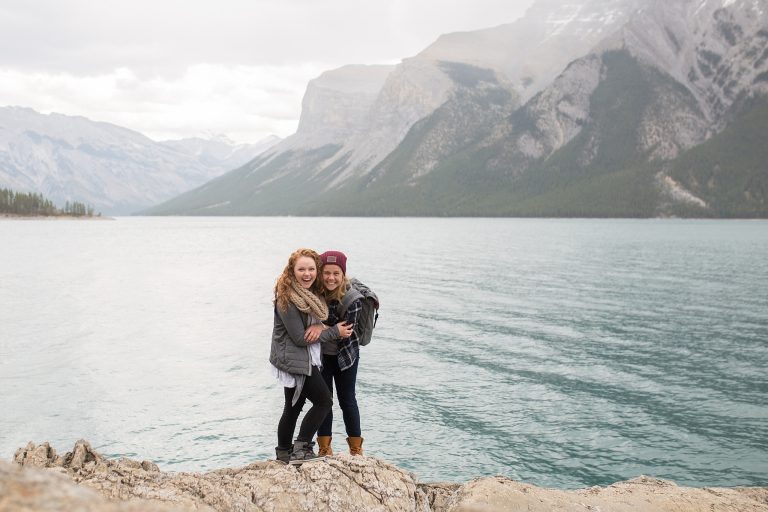
Shade is your friend
When we talk about light, our first instinct might be to think that the more we can get – the better. While shooting in full sun is totally possible and can be beautiful when done well, shooting in the shade is the easiest way to get good light. In the shade you can avoid harsh shadows from sunlight and get consistent light across your entire image. Just like the one below. 🙂

So, shooting in the shade is your best bet IF you can find it, but sometimes it’s out of the question. Say you are in Paris and want a picture in front of the Eiffel Tower, but it’s noon on a bright, sunny day. Obviously, finding shade isn’t going to be an option. If you are shooting in the sun…
Shoot Backlit.
Backlit is just a fancy way of saying shoot with the sun at your back. This works because it blocks that harsh sunlight from your face and give you a pretty rim-light around your head. See?

When you are shooting backlit, it might be a little harder to get perfect focus. Angling your phone to avoid shooting directly into the sun or using your body to block the center of the sun will make it easier to get a sharp photo.
Now say you are on the wrong side of the Eiffel Tower to shoot backlit. Aside from walking all the way to the other side, your only option is to take a shot with full, direct sunlight right in your eyes. The pro tip here is to throw on a pair of sunglasses! The main reason why direct sunlight doesn’t work is because it makes you squint and gives you dark shadows around your eyes; sunglasses solves both problems!

Boom. Instant even light. 😉
If you are inside, get near a window.
So far, we’ve just covered finding good light outside, but say you are in a cute coffee shop and want to snap a pic. Do your best to snag a table close to a window and sit facing towards it, with all the window light pouring in on your face. The window will diffuse it, creating soft, flattering, direct light.
Use that little sun
Have you ever noticed that when you tap to focus on an iPhone, there is a little sun that pops up outside the focus box? That little sun is how you control your exposure. If you slide it up, it brightens your photo. If you slide it down, it darkens your photo.
Personally, I prefer to brighten my images when I edit them, which I’ll talk about in my next post. I just use the little sun for consistency. Sometimes just tapping doesn’t give you the best exposure for what you are trying to capture, especially if you are trying to shoot at night. In this case, I adjust to get the exposure I want, then edit it after as well.
Now that you have your lighting down, it’s time to talk about photo composition. Simply put, composition is how you frame your image. Things like the way you tilt your camera, whether the photo is vertical or landscape, if there is something in the foreground, or where your subject is positioned all affect the composition.
Tips for Creating a Good Composition
Use your grid
First things first, make sure your grid is turned on. If it isn’t, go to settings > camera > grid and make sure the toggle is green. This overlays a 3×3 grid when you are using your camera, which helps while composing your shots.
Follow the rule of thirds
In the photography world, there is a composition rule called the rule of thirds. All this means is that, typically, a photo is most captivating when the subject is off center. Remember that grid? The rule of thirds suggests that if your subject as at any of the spots where 4 lines intersect, it will be a more interesting shot.
One of the most important things to remember with all of these tips, is that rules are meant to be broken. Lately, I have been really into symmetry in my images, which obviously tosses the rule of thirds out the window. Rules are good guidelines but take the creative license to change it up and try new things. After all, it’s your photo, so do what you want!
Consider Your Camera Angle
The way you have your phone tilted + where you stand while shooting can affect your image more than you might think!
Personally, I like to stand directly in front of my subject and shoot straight on, rather than tilting my camera from the side. When you are taking a photo of someone, shooting with your phone raised and tilted down slightly creates a flattering angle. You can also tilt your camera to cut out distracting things on the edges of the frames or include foreground to make your image more interesting.
Both photos below are shot straight on, but the one on the right was taken from slightly farther away with the camera tilted up to cut out the sidewalk and show more of the museum.

One techy tip here is to use your feet. iPhones aren’t really known for having excellent zoom quality. If you are able to walk closer to your subject, you’ll be better off doing that instead of zooming in.
Pay Attention to Lines
Using natural lines to lead your viewers eyes towards the subject of your photo can take your image to the next level. Roads, skylines, railroads, buildings, rivers, a row of trees… basically anything can be used as a leading line in your photo. This is pretty advanced stuff (and took me years to learn), but when used well it can create beautiful images!
Other Photo Tips
Shoot Fast
Well, shoot fast when you are photographing people. Typically, motion looks best for portraits. In order to capture the most natural looking candid photos, shoot often and shoot quickly. Just make sure they are still sharp!
Look at Instagram for Inspiration
Maybe it’s cheating or maybe it’s just using your resources, but if you are stuck on what to do (or how to shoot) at a specific location, search it on Instagram. Scroll through and see what other people have done. This will likely get your wheels turning towards a good idea.
Practice, Practice, Practice
Like any other skill, photography takes time and practice to learn. If you want it to become more natural to you, shoot more often! The only way you will develop your personal style is by shooting a lot and finding out what you like!
Okay y’all. That wraps it up for taking iPhone photos. Next week we are diving into editing: all my favorite apps, how I use them, and more! Stay tuned. 🙂
Pin it for later